I am having so much fun participating in these card / papercraft challenges. It gives me an opportunity to create and to think out of the box sometimes. Not to mention I get to use supplies I seem to have accumulated in the last few years. And revive my blog :-)
This one is for MFT's Sketch Challenge #308.
The fox stamp was from a papercraft magazine I got a couple of months' back and the pattern paper was a gift, so I'm not entirely sure where it's from. The rest of the supplies are listed below.
I love adding background textures with embossing and I thought it turned out quite nice on kraft cardstock. Gives the entire card a rather natural, "earthy" feel.
Saturday, 26 November 2016
Friday, 25 November 2016
Merry Christmas Snowflakes Card
This card is for the Simon Says Stamp Monday Challenge that is Trio-Tastic. It meant I had to use 3 of something on my card. I had already die-cut the words "merry christmas" on black cardstock and had thought of adding 3 simple punched snowflakes to the side. I like using the negative space sometimes and love how the black looks against silver glitter paper.
It's nice to take a break from complicated cards sometimes :-)
Celebrate Christmas Holly Handmade Card
I meant to participate in the MFT card challenges but I completely missed out on the last two. But Simon Says Stamp recently posted a new Wednesday Challenge, and that is to use Christmas themed dies and I have the perfect card to show for it.
This card is so much more sparkly in person. I love the holly die by Taylored Expressions but can't for the life of me locate in on inlinkz (supplies listed below) so I had to choose the nearest option, which is the embossing folder. The background die cuts out quite an intricate pattern. I adorned the "berry" bits with pink crystals from Daiso and stuck them down with glue. The light green cardstock is a bit shimmery and was purchased at a local stationery shop along with the glitter paper in the background.
The "celebrate" word is die-cut from Tim Holtz' Celebration Words die set. It is quite thin and tends to be a bit fiddly, especially if you're layering a few die-cuts on top of each other. I cut the word out from silver glitter foam and popped it up on top of a simple circle vellum piece.
Are you participating in the Simon Says Stamp Wednesday Challenge too?
This card is so much more sparkly in person. I love the holly die by Taylored Expressions but can't for the life of me locate in on inlinkz (supplies listed below) so I had to choose the nearest option, which is the embossing folder. The background die cuts out quite an intricate pattern. I adorned the "berry" bits with pink crystals from Daiso and stuck them down with glue. The light green cardstock is a bit shimmery and was purchased at a local stationery shop along with the glitter paper in the background.
Are you participating in the Simon Says Stamp Wednesday Challenge too?
Saturday, 12 November 2016
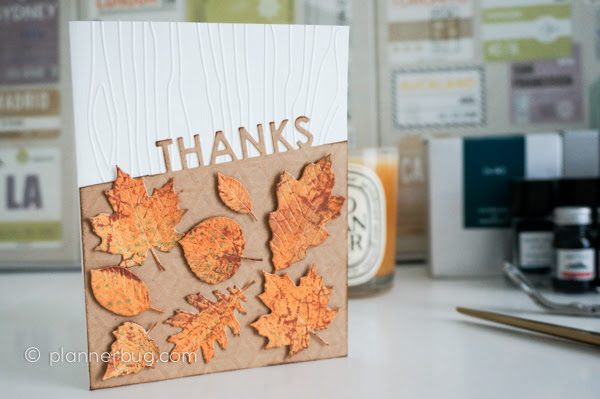
Scattered Leaves Handmade Card
Okay, so the first papercraft challenge that I'm participating in is the Simon Says Stamp Monday and Wednesday challenges, which happen to have the same theme, and that is thanks or Thanksgiving. We don't celebrate Thanksgiving in Malaysia but giving thanks or showing simple gratitude ought to be something we do more often.
I was aiming for a warm autumnal look because I've been wanting to use the MFT Falling Leaves Die-Namics set for a while. To create the colour on my leaves, I used Distress Paint in Spiced Marmalade on top of gesso as a base and layered with the Tim Holtz Dot Fade stencil using Distress Ink in Peacock Feathers. Then I stamped a crackle design by Finnabair with Ranger Archival Ink in Coffee. Oh, and I sprayed some Distress Stain in Tea Dye and went around the edges of the leaves after die-cutting them with Distress Ink in Gathered Twigs.
I initially arranged the leaves in a cluster but I had a hard time distinguishing them because the colours just blended so well together. It resembled an orange lump. So I thought to arrange in a more scattered way, as if the leaves are blown across the card. I much prefer that look.
The white background was embossed in a wood grain pattern by Shimelle and the "thanks" word was die-cut from Technique Tuesday's Straight Talk Thanks. The patterned kraft paper is actually origami paper I bought from Daiso. I had to back it with some cardstock otherwise it will be quite thin.
I will likely make another Thank You card with a different theme. I really like the "thanks" die and just thought of another idea.
Until the next time, I hope y'all are doing well and take care.
I was aiming for a warm autumnal look because I've been wanting to use the MFT Falling Leaves Die-Namics set for a while. To create the colour on my leaves, I used Distress Paint in Spiced Marmalade on top of gesso as a base and layered with the Tim Holtz Dot Fade stencil using Distress Ink in Peacock Feathers. Then I stamped a crackle design by Finnabair with Ranger Archival Ink in Coffee. Oh, and I sprayed some Distress Stain in Tea Dye and went around the edges of the leaves after die-cutting them with Distress Ink in Gathered Twigs.
I initially arranged the leaves in a cluster but I had a hard time distinguishing them because the colours just blended so well together. It resembled an orange lump. So I thought to arrange in a more scattered way, as if the leaves are blown across the card. I much prefer that look.
The white background was embossed in a wood grain pattern by Shimelle and the "thanks" word was die-cut from Technique Tuesday's Straight Talk Thanks. The patterned kraft paper is actually origami paper I bought from Daiso. I had to back it with some cardstock otherwise it will be quite thin.
I will likely make another Thank You card with a different theme. I really like the "thanks" die and just thought of another idea.
Until the next time, I hope y'all are doing well and take care.
Sunday, 26 April 2015
Printables for Your Traveler's Notebook
I have been very happy using pre-made traveler's notebook planner inserts and you can view a more in-depth comparison in my video here. But I thought of listing down several fantastic online resources that offer free printables as an alternative.
What do you use in your traveler's notebook and how do you like it? Do let me know if I have missed any more resources out (non-Etsy) as I'd love to add the links to this post so it can act as a reference in the future.
- My Life All In One Place - Ray offers quite an extensive collection of free printables for nearly all requirements. I'd recommend starting here if you're looking for planner inserts.
- MsWenduhh Plans - Wenda shares many wonderful printables. I am already a fan of her printables for ring binders and am so happy that she has started offering them for traveler's notebooks too. She even has an extensive tutorial on how to print, cut and resize the inserts to fit into your traveler's notebook.
- Morgan Le Fae's Trinkets - Not only is Monique very talented in custom-making unique traveler's notebook style leather covers but she also provides a few free printables that you can use. The link to Dropbox can be found in her post but it takes a while for the templates to load so do be patient.
- The Mint Green Polkadot - I've been following Andrea's blog since she started and really enjoy her art work and creativity. She offers only one traveler's notebook printable but it's a really good one for bullet journaling if you're into that.
What do you use in your traveler's notebook and how do you like it? Do let me know if I have missed any more resources out (non-Etsy) as I'd love to add the links to this post so it can act as a reference in the future.
Saturday, 14 February 2015
Midori Traveler's Notebook
I'm not particularly superstitious but thought I'd better not post the usual blogger interview today just in case the featured person is. I don't know much about urban legends and rather than dwell on the bad juju that may befall us, I'll just show you what has been occupying my time lately.
I came across the Midori Traveler's Notebook (MTN for short) on many Instagram photos and YouTube videos before but it was largely ignored because I didn't think it could work as a planner. A couple of weeks ago, I met a friend who uses an MTN as a planner and after playing around with hers for a bit, I decided to grab the last brown one that was available in Kinokuniya at that time. Don't worry, Kinokuniya restocks MTNs more frequently than Filofaxes so you haven't missed the boat.
The system is a bit of an odd one. It's basically a rectangular piece of leather with elastic strings looped through the middle to hold different notebooks together. You can get notebooks in different formats and insert them between the elastic to create a collection of notebooks. I think it's a lot easier to see how it's done rather than describing it so I'd highly recommend going through YouTube for tutorials on how to set up an MTN.
The standard MTN set (regular size) comes with a cotton bag (but it's rather small especially after you've stuffed the MTN), a leather cover (the main MTN leather piece), a blank notebook, and 2 spare elastic strings.
There are quite a few accessories to help you customise the MTN. I got the kraft file and the zipper pocket to stuff in different stationery. I use four notebooks; an undated monthly calendar, a dated 2015 weekly diary (horizontal), a grid paper notebook and a blank paper notebook that came with the original set. I also got what Midori calls connecting bands, but these are basically just large rubber bands and you can substitute with the 2 spare elastics that comes in the set so you don't need to buy extras.
I don't know what it is about the MTN that draws me in. I love handling it and love the larger pages (compared to a personal sized Filofax). I was also pleasantly surprised that the leather lies completely flat. I'm not sure why I thought it would be too stiff and that it wouldn't.
And speaking of the leather, can I just say how much I love the leather cover. It's about 2.5mm thick but is very pliable. The front is treated with vegetable tannin and many folks have complained that there's a white residue and that it smells chemical-like. But I think mine has been aired quite well as it sat on the display shelves in Kinokuniya for about a week and hardly has any residue or smell. All I can smell is the leather. The inside is untreated and has a distressed quality to it.
The elastic spine seems durable and I've yanked it many times but it hasn't frayed or broke. There is tin clasp on the top that holds the elastic and a bookmark string. But the clasp is flexible enough that it lies on its side so it doesn't poke out when I lay it on a surface.
My biggest concern and what held me back from getting one before was whether it will work as a planner. I watched many setup videos and several I watched multiple times to decide how to set mine up. Majority of what I've seen online use DIY Fish inserts for planning but I didn't want something that I have to print, cut and bind myself because my printer is really old and doesn't handle printing too many sheets well.
Instead, I got the 2015 horizontal calendar notebook (split by 6 months per notebook) and the undated monthly one, which is closer to how my Filofax is set up. I also have a grid notebook for notes, and a blank notebook for random creative things.
As the MTN pages are longer and wider than personal sized Filofax pages, I find that I can fit everything from household to work into the WO2P calendar. At least I don't have to compromise my preferred weekly view. This is probably one of the main reasons why I feel "at peace" using the MTN as a planner because I do not have to split things up into two Filofaxes.
Those who follow my blog will know I'm a big proponent for loose-leaf binders and I still am because I think it's a really flexible system. But the Midori format is relatively flexible in its own way and I like that I can just remove a notebook and take it with me when I'm out and not want the bulk. It's also a lot easier to archive an entire notebook compared to loose-leaf pages.
The Midori Traveler's Notebook is understated, elegant and simplistic in nature.The more used the leather is, the more aged and beautiful it gets. I must also mention the Midori papers are a joy to write on. What else can I say? It's love, true love. Who would have thought that some string and a piece of leather can bring me so much joy? I'm looking forward to seeing how it develops for the rest of the year :-)
Do you use a Midori Traveler's Notebook or a similar fauxdori? Do share in the comments below as I'd love to receive more inspiration on how you use yours.
I came across the Midori Traveler's Notebook (MTN for short) on many Instagram photos and YouTube videos before but it was largely ignored because I didn't think it could work as a planner. A couple of weeks ago, I met a friend who uses an MTN as a planner and after playing around with hers for a bit, I decided to grab the last brown one that was available in Kinokuniya at that time. Don't worry, Kinokuniya restocks MTNs more frequently than Filofaxes so you haven't missed the boat.
The system is a bit of an odd one. It's basically a rectangular piece of leather with elastic strings looped through the middle to hold different notebooks together. You can get notebooks in different formats and insert them between the elastic to create a collection of notebooks. I think it's a lot easier to see how it's done rather than describing it so I'd highly recommend going through YouTube for tutorials on how to set up an MTN.
The standard MTN set (regular size) comes with a cotton bag (but it's rather small especially after you've stuffed the MTN), a leather cover (the main MTN leather piece), a blank notebook, and 2 spare elastic strings.
There are quite a few accessories to help you customise the MTN. I got the kraft file and the zipper pocket to stuff in different stationery. I use four notebooks; an undated monthly calendar, a dated 2015 weekly diary (horizontal), a grid paper notebook and a blank paper notebook that came with the original set. I also got what Midori calls connecting bands, but these are basically just large rubber bands and you can substitute with the 2 spare elastics that comes in the set so you don't need to buy extras.
I don't know what it is about the MTN that draws me in. I love handling it and love the larger pages (compared to a personal sized Filofax). I was also pleasantly surprised that the leather lies completely flat. I'm not sure why I thought it would be too stiff and that it wouldn't.
And speaking of the leather, can I just say how much I love the leather cover. It's about 2.5mm thick but is very pliable. The front is treated with vegetable tannin and many folks have complained that there's a white residue and that it smells chemical-like. But I think mine has been aired quite well as it sat on the display shelves in Kinokuniya for about a week and hardly has any residue or smell. All I can smell is the leather. The inside is untreated and has a distressed quality to it.
The elastic spine seems durable and I've yanked it many times but it hasn't frayed or broke. There is tin clasp on the top that holds the elastic and a bookmark string. But the clasp is flexible enough that it lies on its side so it doesn't poke out when I lay it on a surface.
My biggest concern and what held me back from getting one before was whether it will work as a planner. I watched many setup videos and several I watched multiple times to decide how to set mine up. Majority of what I've seen online use DIY Fish inserts for planning but I didn't want something that I have to print, cut and bind myself because my printer is really old and doesn't handle printing too many sheets well.
Instead, I got the 2015 horizontal calendar notebook (split by 6 months per notebook) and the undated monthly one, which is closer to how my Filofax is set up. I also have a grid notebook for notes, and a blank notebook for random creative things.
As the MTN pages are longer and wider than personal sized Filofax pages, I find that I can fit everything from household to work into the WO2P calendar. At least I don't have to compromise my preferred weekly view. This is probably one of the main reasons why I feel "at peace" using the MTN as a planner because I do not have to split things up into two Filofaxes.
Those who follow my blog will know I'm a big proponent for loose-leaf binders and I still am because I think it's a really flexible system. But the Midori format is relatively flexible in its own way and I like that I can just remove a notebook and take it with me when I'm out and not want the bulk. It's also a lot easier to archive an entire notebook compared to loose-leaf pages.
The Midori Traveler's Notebook is understated, elegant and simplistic in nature.The more used the leather is, the more aged and beautiful it gets. I must also mention the Midori papers are a joy to write on. What else can I say? It's love, true love. Who would have thought that some string and a piece of leather can bring me so much joy? I'm looking forward to seeing how it develops for the rest of the year :-)
Do you use a Midori Traveler's Notebook or a similar fauxdori? Do share in the comments below as I'd love to receive more inspiration on how you use yours.
Friday, 5 December 2014
Favourite Free and Paid Planner Printables
A friend of mine requested if I could list down a few of my favourite planner printables as she is just starting out with using a planner herself. I thought it was a good idea to turn it into a blog post, that way it is archived somewhere in cyberland and it's probably a lot easier to refer to in the future.
I won't be covering supplementary printables, such as menu or household cleaning plans because I have blogged about them separately. I will focus more on daily or weekly formats in this post.
FREE:
I normally print on pre-punched and pre-cut blank papers that I got from various local bookstores. Each stack is quite inexpensive and cost less than RM10. I have also setup a "Personal" and "Pocket" page layout on my Macbook so they are resized to print correctly. Philofaxy has a very thorough guideline for printing your own diary pages but I followed Ms Wenduhh's tips as I'm a Mac user.
Do you have a favourite planner printable? What about designing your own printable? Do pop in a share your thoughts and feel free to include a link (to the printable) in the comment area.
I won't be covering supplementary printables, such as menu or household cleaning plans because I have blogged about them separately. I will focus more on daily or weekly formats in this post.
FREE:
- Philofaxy - This is probably the best place to start. You will find loads of different formats for various planner sizes. I believe the Word doc is editable and you can customise the pages further to suit your needs.
- Ms. Wenduhh - I really like her Pastel WO2P inserts and printed them in pocket size (as shown in the photo above) for my new pocket planners. She also has quite a few different formats available. Wonderful stuff!
- My Life All In One Place - This is another amazing place for free planner printables. Very useful if you're looking for no-frills type of inserts.
- StudioL2E - Not only am I a huge fan of her fabulous planner stamps, but I really like the printables she created too. They are currently offered in personal size only but I think the A5 would be available soon.
- Piaric - This is a good place to have a look if you want ready-made refills. The prices are pretty reasonable. I've seen a lot of happy Piaric customers and the inserts look really nice too. At the moment, she only does orders through the Facebook page.
- Miss Tiina (Etsy) - I came across Miss Tiina's blog when I was starting out with using planners and was immediately attracted to the colourful inserts. She offers a few free printables on her blog too.
- DIY Fish (Etsy) - Fish is the creator of the popular Life Mapping System and there are refills to suit all types of planners. Her inserts are very popular amongst the planning crowd but is a bit busy for my own personal use. I do admire her system though, it's very well thought out and structured.
- Cute Organizing (Etsy) - I am a very big fan of Sachiko's adorable dividers and purchased a pocket set. She offers printable monthly and daily/weekly refills in her shop too.
- Lime Tree Fruits - I really like Raine's artwork and her printable inserts are lovely! She was featured on my blog just last Friday :-) And if you purchase her planner set, you'd get to join her secret Facebook group! Exciting stuff!
- Mrs Brimbles (Etsy) - Who can forget the fab Mrs. B? She was the first person I interviewed in the Friday Feature and I had a blast reading her response. Her Etsy shop is filled with all sorts of goodies and there are quite a few printables available too.
I normally print on pre-punched and pre-cut blank papers that I got from various local bookstores. Each stack is quite inexpensive and cost less than RM10. I have also setup a "Personal" and "Pocket" page layout on my Macbook so they are resized to print correctly. Philofaxy has a very thorough guideline for printing your own diary pages but I followed Ms Wenduhh's tips as I'm a Mac user.
Do you have a favourite planner printable? What about designing your own printable? Do pop in a share your thoughts and feel free to include a link (to the printable) in the comment area.
Subscribe to:
Posts (Atom)